Creating A Functioning Overdrive
For this post I wanted to go ahead and build something more interesting. Something that will significantly alter the sound of the guitar. As of the last post, I have a functioning volume slider that I can use to change the volume of my audio input and play it back. Now I would like to try something similar to changing the volume, but something a little more complex. The perfect effect for this purpose is overdrive/distortion.
Distortion is an effect that guitar players frequently use to make their guitar sound more powerful. Most guitar amplifiers sold today come with some kind of overdrive channel that can be used separate from the clean input sound. In the realm of analog amplifiers this distortion is caused by, simply put, the signal being amplified beyond the tolerance of the equipment. Sound travels in waves, and amplifying it, or changing its amplitude, just causes the size of the peaks and the troughs of the wave to grow larger. There is more energy in the system. There is a limit to how much we can amplify clean signals, however, before the waves start “clipping”. The tops and bottoms of the waves are compressed so that the more you push, you do not get any more amplitude, you just start to flatten the waves more and more. We hear this as distortion. The earliest amplifiers ran into this problem and wished to solve it, but artists quickly found ways to harness this distortion.


That brings us to the program. For this week I did some research and saw some great examples of clever ways to create subtly different kinds of distortion, which I intend to explore in the next post. For now, I have incorporated one of those approaches to the volume slider program from before. There is now another slider called “driveKnob” that will be used to handle the distortion while there is still a clean volume knob as well. This is a common setup for guitar amplifiers and effect pedals.
In order to do this there are a couple changes I made to the program. First, I created an additional UI element to control the level of distortion. I made this a rotary slider because that mimics the kind of knob you would see on an amplifier. I also changed the old volume slider to a rotary slider as well. There is also a variable that tracks the value of the slider and a function that will update the audio processor class when the value on the knob changes. The function takes a slider as an argument and will update the values for volume and drive in the audio processor whenever either knob is moved.


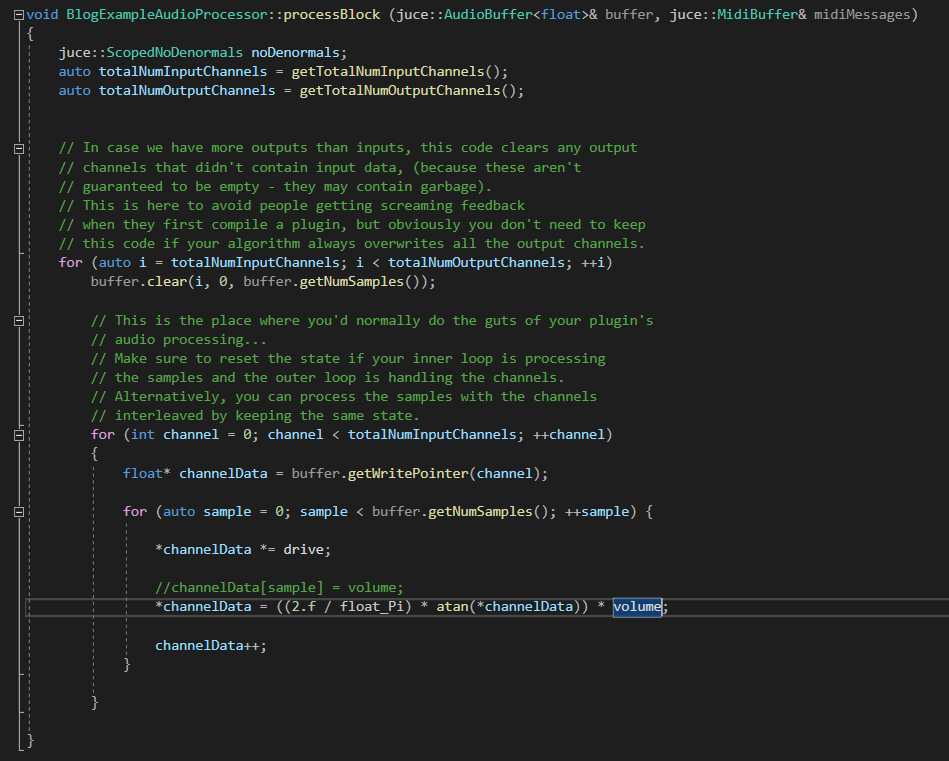
The fun begins when we get into the processBlock() method in the audio processor class. This is where the data is actually manipulated as I explained last week but I will explain a little further here. There is an array of samples coming in from the audio input that is stored in buffers.There is a pointer to the data coming in from each channel that we can access and manipulate to create audio effects. In this case, we can change the volume by simply setting the volume equal to the channel data, or by making our volume variable some kind of fraction to multiply the data by. Each of the samples coming in has its amplitude stored here. By setting the value to our volume we can cleanly boost or drop its amplitude. The problem here is that we will not get the same effect here from doing this that guitar amplifiers achieve. Amplifiers boost the signal until it naturally starts clipping, but we need a way to mimic this.
The most basic way to create distortion digitally is to check if the channelData is above a certain number or below another and to set it equal to that number. This would accomplish the most basic mechanic of clipping which is compressing waves if the amplitude grows too large. But there are better methods to create a smoother distortion that will sound more like a natural distortion from a real amplifier. A good starting point is to take the arctangent of the channel data and multiply it by 2/pi. The code for this is posted below so you can see what this looks like. This creates a clipping effect but it is a little smoother than just cutting off the top of the waves if they are above a certain amplitude. I will post some sound samples that you can check out to hear what this program actually accomplishes.

Finally, in response to a question from last week, if you are using a microphone for an acoustic instrument you should still use the ASIO SDK if you are plugging it into an audio interface if I am not mistaken. My audio interface and many of the most popular ones are ASIO audio interfaces so you will find there is much less latency if you use the ASIO SDK for your audio programs. If you are using a different kind of audio interface or not using one at all you may not need this SDK.
Next week I am planning on diving deeper into distortions and overdrives to find different approaches to them. As a guitar player I am very aware of the subtle differences between amplifiers and how they each have their own character to their distortion. Capturing these differences in digital audio is interesting to me so I would like to see what I can dig up.


Comments
Post a Comment